IMAT is fairly easy to install. There are two components: the license server (Sentinel RMS), and the IMAT toolbox itself.
You can download Sentinel RMS and IMAT at www.ata-e.com/software/ata-software.
Sentinel RMS is a robust, commercial client-server based licensing system from SafeNet that can serve multiple licenses for multiple software products simultaneously. The server typically resides on a central computer. The client software such as IMAT will reside on computers that will be utilizing the software. The client computer may or may not be the same as the license server. It can also be on a different software platform than the client.
Sentinel RMS installation is straight forward. Detailed installation instructions are shipped with the Sentinel RMS package available from ATA's website. This document highlights the basics of the installation process.
On Windows the Sentinel RMS package is an InstallShield application. As such, it must be installed by someone with administrator privileges. ATA recommends that the default selections be used during the installation.
On Unix/Linux the Sentinel RMS package is a gzipped tar file. Extracting this file will create an ata_rms directory with several files. Sentinel RMS does not need to be installed as root, but root privileges are needed to run the server. The Sentinel RMS documentation provides details about the setup process.
All Sentinel RMS clients need a way to determine where the server is running. By default, the client will scan the subnet your client system is connected to and will identify any Sentinel RMS servers running on your subnet. It will then contact each until the license request is satisfied or it has run out of servers. You can control the order in which the servers are contacted through an environment variable called LSHOST. Set the environment variable to the hostname of the server, separated by a tilde (~). The server name must be prepended by the name 'no-net'. For example, set it to
no-net~server
where server is the name of the license server.
If you only have one server and wish to bypass the network scan by the client, you can use the environment variable LSFORCEHOST. This is also required if your license server is on a different subnet from the IMAT client comptuer. ATA recommends using LSFORCEHOST if possible, as it speeds up the initial license checkout. You can only specify a single server with this environment variable. For example, you can set it to
server
By default the license server and client communicate on port 5093. If your Sentinel RMS server is running on a non-default port, you can configure the client to communicate on this port by setting the LSPORT environment variable to the port number to use.
On Windows the environment variable can be set in Control Panel, typically in System. On Unix/Linux you can set the environment variable with setenv or by using export, depending on your shell. Please ask your system administrator or refer to your operating system documentation for more details on how to set environment variables.
You can use the WlmAdmin application included in the top-level IMAT directory to check the status of the licenses. When the GUI opens, open up Subnet Servers in the tree on the left. Under each license server, the individual licenses will be listed. Clicking on a license will display statistics about that license, including who is using it and how many are available.
For a complete set of instructions on performing this task, please refer to the Sentinel RMS user guide. The instructions here simply demonstrate the basic process.
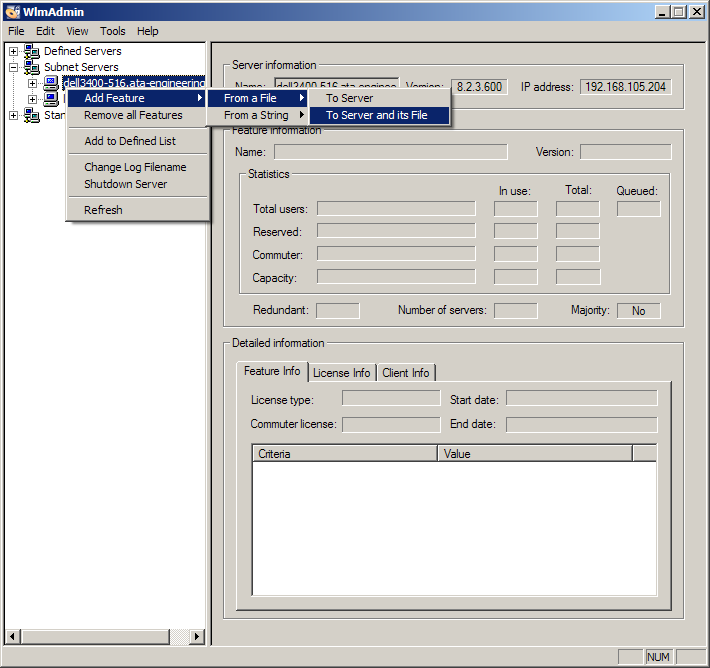
From Windows, open the RMS License Administration application (WlmAdmin) located in the IMAT installation. It is located in Start | Programs | ATA Engineering | Sentinel RMS Licensing | RMS License Administration. Once the application starts, install the license by right-clicking on the appropriate license server and following the menus as shown in the figure below. The license will be immediately available.
On Linux/Unix, your system administrator can install the license file by adding the license text to the lservrc file in the license server installation directory.
Sentinel RMS provides the capability to commute a license. This capability allows you to check out a license from the server, disconnect the client machine from the network, and continue to use that license off the network for a specified period of time. When you reconnect to the network, you can check the commuted license back in.
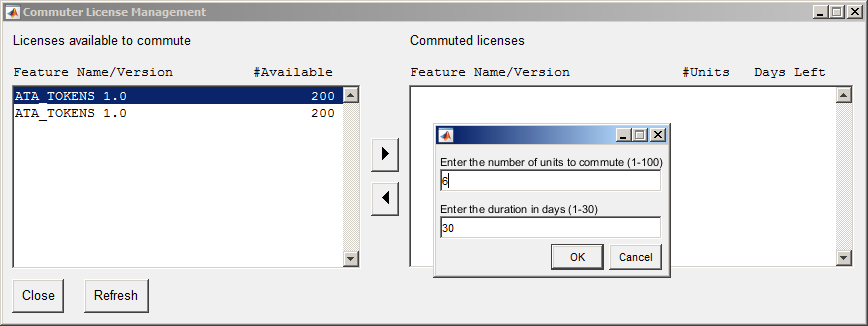
IMAT has made this capability available through a utility called license_commute. Called with no arguments, it displays a graphical interface that shows the licenses available for checkout, as well as the licenses already commuted. You can check out additional licenses or return commuted licenses through this interface. Please note that you can only have one set of licenses commuted for a given Feature Name and Feature Version combination. It is also up to you to commute the correct number of units that you need to run the IMAT toolboxes you need. This is important if you are using tokens, because the different IMAT toolboxes use different numbers of tokens.
When you commute a license with license_commute (shown in the figure below) you can specify the duration of the commuted license, up to the maximum duration allowed by the license server. The maximum duration allowed is specified in the license file on the server. After the allotted time period, if you have not checked the license(s) back in, they will expire on the client and will be available for use again on the server. You can also specify the number of licenses to commute. This may be necessary if you are using tokens, as different products use different numbers of tokens.
On Windows, the WlmAdmin utility provided with IMAT also displays the commuted licenses. Look under Standalone | Commuter.
Please note that when you commute a license and remove your machine from the network, you may need to reset your LSHOST environment variable to only specify no-net (or use LSFORCEHOST), otherwise the license client may timeout with an error about being unable to locate the your license server. The following steps guide you through the process of commuting, using, and then checking in a license.
IMAT installation consists of extracting the package contents, setting up your MATLAB path, and setting up your system path. On Windows IMAT is distributed as an executable that runs an installer. NSIS is used to generate the installer. It will automatically install itself in the MATLAB/toolbox directory by default. You must still edit your MATLAB path.
On Windows, the installer supports a silent-mode installation that does not require user input. To utilize this mode, simply run the installer from a command prompt with administrator privileges with the "/S" flag (note that it must be capitalized), as in
> IMAT_*_win64_setup.exe /S
Additional command-line options are also supported. To specify a custom installation path, use the "/D=<path>" option. This must be the last option specified on the command line, and the path must not be wrapped in quotes, even if it has spaces in it.
By default the silent installer will set the Java paths (classpath.txt and librarypath.txt), which are necessary for VTK to work. To tell the installer not to update the paths in Silent mode, use the "/SETPATHS=no" option. Please note that the options are case sensitive. Specify these options exactly as they are shown here.
The following is an example of a silent installation utilizing all of these options.
> IMAT_*_win64_setup.exe /S /SETPATHS=no /D=c:\my custom path
The IMAT toolbox can reside anywhere on your system, as long as MATLAB can find it. However, ATA recommends that IMAT be installed the imat_v### (where ### is the release version number) subdirectory in the toolbox directory of your MATLAB installation. On Windows the toolbox comes as a self-extracting archive. On Unix/Linux the toolbox comes as a gzipped tar file. On Mac the toolbox comes as a Mac installer .dmg file.
The IMAT Toolbox files are located in the following directories (where %IMAT_INSTL% is the top level directory of the IMAT Toolbox):
| %IMAT_INSTL%\README.txt | The readme file |
| %IMAT_INSTL%\imat | Toolbox files for IMAT (also contains IMAT+FEA and other toolbox functionality) |
| %IMAT_INSTL%\opoly | Toolbox files for OPoly modal curvefitter (IMAT+Modal) |
| %IMAT_INSTL%\spfrf | Toolbox files for Signal Processing GUI (IMAT+Signal) |
| %IMAT_INSTL%\ga | Toolbox files for Genetic Algorithm (IMAT+Modal) |
| %IMAT_INSTL%\mtk | Toolbox files for Modal Toolkit (IMAT+Modal) |
| %IMAT_INSTL%\tamkit | Toolbox files for TAMKIT (IMAT+Modal) |
| %IMAT_INSTL%\rtk | Toolbox files for Rotational Toolkit(IMAT+Signal) |
| %IMAT_INSTL%\doc | Documentation (HTML format) |
| %IMAT_INSTL%\examples | Useful examples using the IMAT toolbox |
| %IMAT_INSTL%\gethostid.exe | Graphical utility that generates hostid.txt for license server credentials |
| %IMAT_INSTL%\echoid.cmd | Text-based utility that generates echoid.txt for license server credentials |
| %IMAT_INSTL%\WlmAdmin.exe | Check license status |
In order to use the IMAT Toolbox, you must arrange for the %IMAT_INSTL%\imat directory to be in your MATLAB search path. This can be done by an individual user, or it can be set up by the system administrator for all MATLAB users. Two methods for setting up the path are given below, and experienced MATLAB users will know of other ways. (In the following instructions, %MATLAB% refers to your top level MATLAB directory, and %IMAT_INSTL% refers to your top level directory where IMAT is installed.)
Option 1 (does not require sysadmin):
Create a file called startup.m (or edit an existing one). Put the following command in this file:
addpath %IMAT_INSTL%\imat -end
addpath %IMAT_INSTL%\opoly -end
addpath %IMAT_INSTL%\spfrf -end
addpath %IMAT_INSTL%\ga -end
addpath %IMAT_INSTL%\mtk -end
addpath %IMAT_INSTL%\tamkit -end
addpath %IMAT_INSTL%\rtk -end
addpath %IMAT_INSTL%\examples -end
(but use the actual path in place of %IMAT_INSTL%.) This will add the IMAT toolbox to the end of your MATLAB path. The second command is necessary to use the example programs provided with the IMAT toolbox.
Option 2 (requires sysadmin):
Edit the file %MATLAB%\toolbox\local\matlabrc.m and insert the following commands in this file (after the default path is set):
addpath %IMAT_INSTL%\imat -end
addpath %IMAT_INSTL%\opoly -end
addpath %IMAT_INSTL%\spfrf -end
addpath %IMAT_INSTL%\ga -end
addpath %IMAT_INSTL%\mtk -end
addpath %IMAT_INSTL%\tamkit -end
addpath %IMAT_INSTL%\rtk -end
addpath %IMAT_INSTL%\examples -end
(but use the actual path in place of %IMAT_INSTL%.) This will add the IMAT toolbox to the end of your MATLAB path. This change will need to be repeated if you update or reinstall MATLAB.
Option 3 (recommended, requires sysadmin):
Edit the file %MATLAB%\toolbox\local\pathdef.m and insert a line for the %IMAT_INSTL%\imat directory. The new file will look something like this:
function p = pathdef
<lines omitted...>
p = [...
%-- BEGIN ENTRIES --%
matlabroot,'\toolbox\matlab\general;',...
<lines omitted...>
matlabroot,'\toolbox\local;',...
'%IMAT_INSTL%/imat;',...
'%IMAT_INSTL%/opoly;',...
'%IMAT_INSTL%/spfrf;',...
'%IMAT_INSTL%/ga;',...
'%IMAT_INSTL%/mtk;',...
'%IMAT_INSTL%/tamkit;',...
'%IMAT_INSTL%/rtk;',...
'%IMAT_INSTL%/examples;',...
%-- END ENTRIES --%
...
];
p = [userpath,p];
Use the actual path name (e.g., 'C:\apps\matlab\toolbox') for %IMAT_INSTL%. A disadvantage of this method is that any MATLAB upgrade or new installation will overwrite this file, so the change will need to be repeated.
The readodb function in IMAT uses shared object libraries to access the ODB. These shared object libraries must be installed somewhere in your system path, so MATLAB can find them. Note that this is NOT the same as your MATLAB path. Please see your system administrator or operating system documentation for details if you are not sure how to modify your system path. If you are on Windows and used the NSIS installer, the system path should automatically be set up.
The necessary ABAQUS libraries are included in the IMAT distribution in the imat\odblib directory. You may either add this directory to your path, or move the shared object libraries to a location that is already in your system path. These libraries are also distributed with ABAQUS. If you have the version of ABAQUS supported by this version of IMAT (see the revision history for this information) installed on your system, you have the option of adding these directories to your system path:
%ABAQUS%\cae\exec\lbr
%ABAQUS%\cae\external
If you install IMAT into MATLAB’s toolbox directory, and you are using the Toolbox Path Cache, you will need to update it. You can do this in MATLAB in File, Preferences. Under the General section at the top of the form there is a section titled “Toolbox path caching”. Simply click on the button that says “Update Toolbox Path Cache”. Alternately, you can also disable the toolbox path cache by unchecking the box labeled “Enable toolbox path cache”.
IMAT uses Java for several features. One is our implementation of UITABLE, which uses uitable_renderer.jar. The second is VTKPLOT, a full-featured FEM and result visualization capability. The VTKPLOT functionality uses two JAR files, vtk.jar and femplotclass.jar. All of these JAR files must be in the MATLAB Java classpath (classpath.txt; see javaclasspath in MATLAB). If the JAR files are not on the Java classpath, IMAT will attempt to add them to the dynamic path at runtime. For better performance, the JAR files should be on the static classpath. See below for instructions on how to add these JAR files to the MATLAB static Java classpath.
In addition, VTKPLOT requires that the shared object files that it uses be located on the Java JNI library path (librarypath.txt). This path cannot be added dynamically at runtime; it must be configured in librarypath.txt prior to starting MATLAB.
On Windows, the installer will automatically update the classpath.txt and librarypath.txt files in the MATLAB installation, so no further action is required. On Linux and Mac, you will need to manually modify the librarypath.txt file. If you modify your MATLAB installation after installing IMAT, MATLAB will overwrite the classpath.txt file, and you will need to modify it manually.
If you do not have administrator permissions to your MATLAB installation, you can place local copies of classpath.txt and librarypath.txt into your MATLAB startup directory. The local Java classpath files must be named javaclasspath.txt and javalibrarypath.txt.
To add the JAR files to the Java static classpath, add these lines to the bottom of classpath.txt, if you are editing the file located in the MATLAB installation. If you are creating a local file in your MATLAB startup directory, it need only contain these lines. You will need to replace %IMAT_INSTL% with the actual path to your IMAT installation, and %PLATFORM% to the actual platform directory. You can verify the correct %PLATFORM% to use by navigating your IMAT installation directory to see what is installed.
%IMAT_INSTL%\imat\vtklib\%PLATFORM%\vtk.jar
%IMAT_INSTL%\imat\vtklib\%PLATFORM%\femplotClass.jar
%IMAT_INSTL%\imat\uitable_renderer.jar
To add the shared object directory to the Java static JNI library classpath, add this line to the bottom of librarypath.txt.
%IMAT_INSTL%\imat\vtklib\%PLATFORM%\